This Kubernetes Architecture series covers the main components used in Kubernetes and provides an introduction to Kubernetes architecture. After reading these blogs, you’ll have a much deeper understanding of the main reasons for choosing Kubernetes as well as the main components that are involved when you start running applications on Kubernetes.
This blog series covers the following topics:
Part 3: Kubernetes Data Plane Components
Kubernetes is a powerful container orchestration platform that has become the de facto standard for managing containerized applications at scale. At the heart of the Kubernetes architecture is the data plane, which is responsible for handling the actual traffic between the containers that make up a Kubernetes cluster.
In this blog post, we take a closer look at the Kubernetes data plane and explore its key components, functions and best practices for designing and operating a high-performance, scalable Kubernetes cluster. We discuss the role of kube-proxy and the Container Network Interface, as well as examine how Kubernetes networking works and how to optimize your data plane configuration for maximum efficiency and reliability. Whether you are a developer, an SRE, a platform engineer or a DevOps engineer, understanding the Kubernetes data plane is essential for building and operating modern, cloud-native applications.
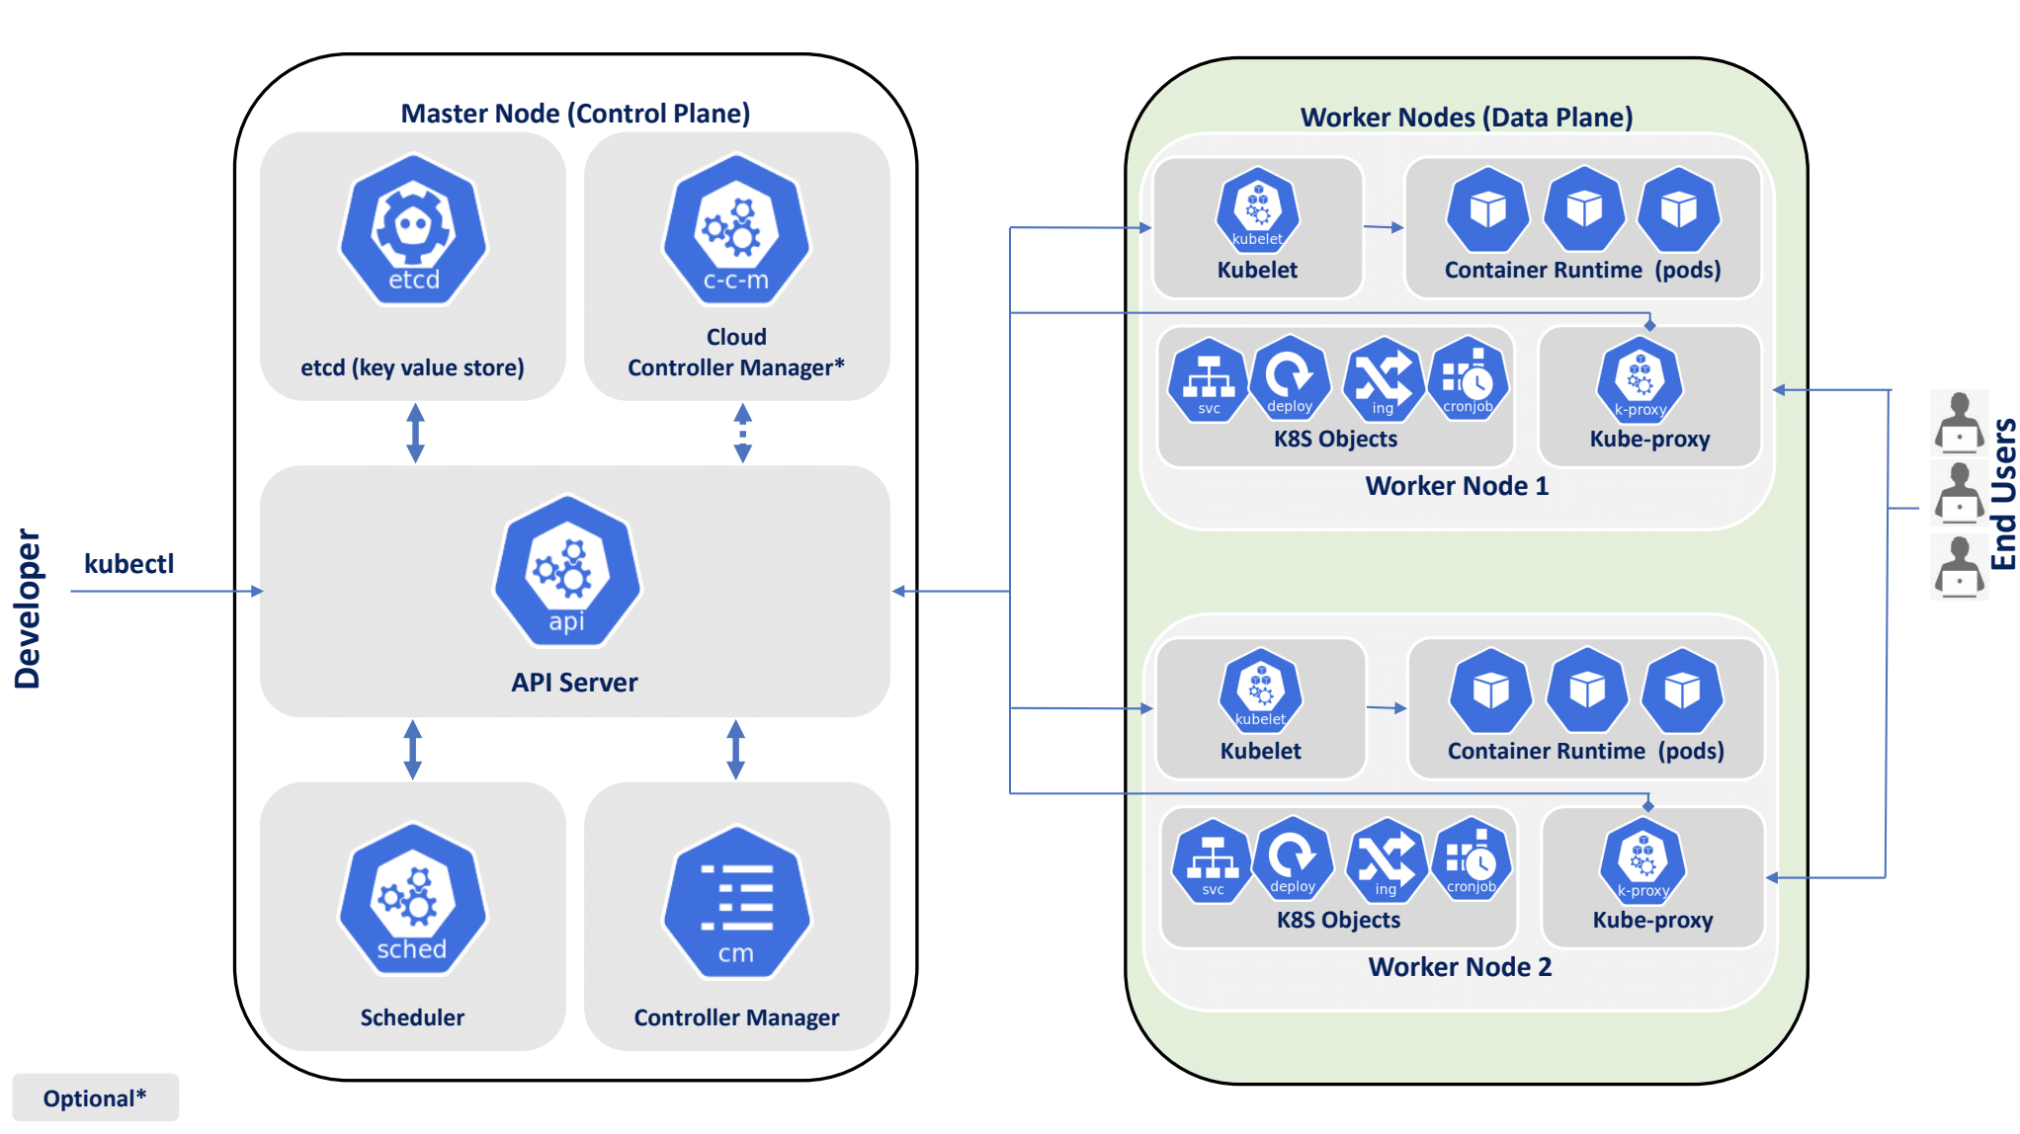
The data plane, running on worker nodes in Kubernetes, is composed of several key components, including kube-proxy, kubelet and the networking model that is used to define how containers communicate with each other. In the data plane, pods are scheduled that run containers with your workloads.
Worker Node
In Kubernetes, a worker node is a computing node that runs the containers that make up an application. Each worker node typically runs many containers, each of which encapsulates a part of the application or service that is being deployed.
Worker nodes are responsible for executing the tasks assigned to them by the Kubernetes control plane , which is responsible for managing and orchestrating the containers running on the worker nodes. These tasks include starting and stopping containers, scaling the number of containers running on a node up or down and handling failovers and resiliency in the event of container or node failures.
In addition to running containers, worker nodes also provide a range of supporting services that are required for the operation of the containers. These services include network connectivity, storage services and other infrastructure services that provide the foundation for running a production-grade application.
Worker nodes are typically organized into a cluster, with each node running the same software and services as the other nodes in the cluster. This configuration provides a high degree of redundancy and resilience, as well as the ability to scale the application up or down by adding or removing nodes from the cluster.
The worker node is a critical component of the Kubernetes architecture, providing the computing resources and services necessary to run containerized applications at scale. Understanding how to design, deploy and manage worker nodes is essential for building and operating modern, cloud-native applications in Kubernetes.
Namespace
A namespace is a way to organize a cluster into virtual ‘sub-clusters’. Any number of namespaces is supported within a cluster. Namespaces are logically separated from each other but can communicate with each other.
Each cluster contains the following namespaces:
default: By default, all the resources created in a Kubernetes cluster are created in the default namespace.
By default, the default namespace can allow applications to run with unbounded CPU and memory requests/limits (until someone sets a resource quota for the default namespace).
kube-public: Kube-public is the namespace for resources that are publicly readable by all users. This namespace is generally reserved for cluster usage.
kube-system: Kube-system is the namespace for objects created by the control plane in Kubernetes systems.
With Role-Based Access Control (RBAC), we can control the access permissions within a particular Kubernetes namespace. The cluster Admin can control the access permission granted to a user or groups of users in specific Kubernetes namespaces; this control can be achieved with the help of role binding.
It is best practice to use custom namespaces for all your workloads running on K8s so you can achieve better resource management, security, isolation and organization of workloads. Custom namespaces make it easier to manage complex deployments and maintain a well-structured cluster.
Pod
In Kubernetes, a pod is the smallest deployable unit that you can create and manage. A pod represents a single instance of a running process in a Kubernetes cluster and can contain one or more containers that share the same network namespace and file system.
The primary purpose of a pod is to provide a way to define, run and manage containers within a Kubernetes cluster. A pod defines a container, and the container runs on a container runtime such as containerd or Docker. When you create a pod, you specify the container image(s) that should be run, as well as any configuration or resource requirements for the containers.
Pods are typically created and managed using a higher-level abstraction called a Deployment, which provides a declarative way to specify the desired state of the pods and the number of replicas that should be running at any given time. Deployments also provide a way to perform rolling updates and rollbacks of the containers running in the pods, without affecting the availability of the application.
Each pod in a Kubernetes cluster is assigned a unique IP address and can communicate with other pods within the same cluster using that IP address. Pods can also be exposed to the outside world using a Service, which provides a stable IP address and DNS name that can be used to access the pods from outside the cluster.
Pods are a fundamental building block of the Kubernetes architecture, providing a way to run and manage containerized applications in a scalable, resilient and portable manner. By using pods, you can easily define the behavior and resource requirements of your containers, while also ensuring that they can communicate with each other and with other components in the cluster.
Service
In Kubernetes, a Service is an abstraction that defines a logical set of pods and a network policy by which to access them. A Service provides a stable IP address and DNS name that can be used to access the pods that it targets, regardless of their actual network location or underlying IP addresses.
In essence, a Service acts as a load balancer for a set of pods, allowing clients to access them through a single, stable endpoint. This design makes it easy to scale applications horizontally by adding or removing pods, without affecting the way clients access the application.
There are several types of Services in Kubernetes, including ClusterIP, NodePort, and LoadBalancer. Each type has its own unique set of features and use cases:
ClusterIP: A ClusterIP Service provides a stable IP address and DNS name for a set of pods within a Kubernetes cluster. This Service allows other pods in the same cluster to access the Service by its DNS name, while also ensuring that the Service is not accessible from outside the cluster.
Note: To access a Service from outside the cluster, you need a LoadBalancer or NodePort Service. ClusterIP Services are internal Services, for use only by other Services inside the cluster/namespace.
NodePort: A Service defines how to access a set of pods, and those pods are running on nodes. A NodePort Service exposes a set of pods to the outside world by mapping a port on their Kubernetes node to a port on the Service. This mapping allows clients to access the Service by connecting to the IP address of any node in the cluster, on the specified port.
LoadBalancer: A LoadBalancer Service provides a stable IP address and DNS name that is accessible from outside the Kubernetes cluster. This Service is typically used when you need to expose a Service to external clients or to other Services running outside the Kubernetes cluster.
Services are a critical component of the Kubernetes architecture, providing a stable and scalable way to expose and access containerized applications. By defining a Service for a set of pods, you can easily manage access to your application, while also ensuring that it can scale horizontally to meet demand.
Kube-proxy
In Kubernetes, kube-proxy is a network proxy that runs on each node in the cluster and provides a way to access Services running on those nodes.
The primary purpose of kube-proxy is to ensure that clients can access Services in a consistent and reliable way, regardless of which node the Service is running on. To achieve this, kube-proxy maintains a set of network rules on each node that define how traffic should be forwarded to the appropriate Service.
There are several modes of kube-proxy operation, including userspace, iptables, and ipvs. The most common mode is iptables, which is used by default in most Kubernetes installations.
Kube-proxy also provides support for load balancing, which allows traffic to be distributed across multiple pods running the same Service. This is typically done using a round-robin algorithm, where each request is forwarded to the next available pod in the set.
Kube-proxy provides a way to access and load balance Services running on nodes in the cluster. By using kube-proxy, you can ensure that your Services are highly available, resilient and scalable, while also providing a consistent and reliable experience for clients accessing those Services.
Kube-proxy can run directly on a physical machine, or as a static pod or DaemonSet.
The following implementations are supported:
iptables: iptables implements Service load balancing in the form of iptables rules. The main problem with using this mechanism is that too many iptables rules are generated when there are too many Services. Non-incremental updates will introduce a certain delay, and there are obvious performance problems in large-scale cases.
ipvs: In order to solve the performance problem of iptables mode, Kubernetes v1.11 adds ipvs mode, adopts incremental updates and can ensure that the connection remains continuously open during Service updates.
userspace: (Linux, Windows, deprecated) The earliest load balancing scheme, userspace listens to a port in user space. All Services are forwarded to this port through iptables and then load balanced to the actual pod inside it. The main problems with using this method are low efficiency and obvious performance bottlenecks. This mode is already deprecated.
winuserspace (Windows, deprecated): Same as userspace, but only works on Windows nodes.
Kubelet
A kubelet is an agent that runs on each node in a Kubernetes cluster. Its primary responsibility is to ensure that the containers running on the node are healthy and are running as expected, according to the specifications defined in the pod manifest. The pod manifest is a YAML file that defines one or more containers to be deployed as part of a pod.
The kubelet communicates with the Kubernetes API server to receive instructions on what containers to run on the node, and it monitors the health of those containers. If a container fails, the kubelet restarts it or takes other action as defined in the pod manifest. The kubelet also manages the networking of the containers, ensuring that they can communicate with other containers and Services within the cluster.
In addition to managing containers, the kubelet also performs other tasks, such as mounting volumes, running probes to check container health and collecting metrics about the containers running on the node. It communicates with other Kubernetes components, such as kube-proxy and the container runtime, to coordinate the deployment and management of containers.
The kubelet is a critical component of the Kubernetes system, responsible for ensuring that the containers running on each node in the cluster are healthy and functioning as expected.
Container Network Interface (CNI)
The Container Network Interface (CNI) serves as a crucial bridge between network namespaces within pods and the networking infrastructure in a Kubernetes cluster, facilitating communication across nodes. It enables seamless integration between various network providers or plug-ins available in Kubernetes, offering a wide range of features and capabilities.
With the CNI framework, multiple CNI providers and plug-ins can be chosen, each offering distinct functionalities. These plug-ins have the ability to dynamically configure networks and allocate resources as Pods are created or removed. They effectively manage IP addresses for the cluster, ensuring proper provisioning and cleanup when containers are instantiated or terminated.
While Kubernetes itself serves as the default networking provider, additional CNI plug-ins such as Flannel, Calico, Canal and Weave Net bring supplementary capabilities to the table, enhancing networking functionality within the Kubernetes cluster.
The CNI acts as an essential intermediary, facilitating efficient networking operations in Kubernetes by connecting network namespaces, allowing integration with diverse CNI providers and plug-ins, and enabling dynamic network configuration and resource management for Pods.
Tips to optimize your data plane configuration
To optimize your data plane configuration for maximum efficiency and reliability in Kubernetes, you can follow these best practices:
Monitor the golden signals: Monitor the latency, throughput and error rate of each individual service and observe how the services interact to be able to find issues.
Optimize resource allocation: Resource allocation is critical for ensuring maximum efficiency and reliability in your Kubernetes data plane configuration. You should allocate resources such as CPU and memory based on the specific needs of each service. You can also use tools such as horizontal pod autoscaling (HPA) to automatically adjust resource allocation based on demand.
Use network policies: Network policies can help you control traffic flow within your Kubernetes cluster, ensuring that only authorized traffic is allowed to flow between services. They can improve both security and performance by reducing the amount of unnecessary traffic flowing through your cluster.
Use ingress controllers: Ingress controllers can help you manage external traffic to your Kubernetes cluster, providing features such as SSL termination, load balancing and request routing. By optimizing your ingress configuration, you can improve the reliability and efficiency of your data plane.
Use container image registries: Container image registries can help you manage and distribute container images within your Kubernetes cluster. By optimizing your image registry configuration, you can improve the speed and reliability of image pulls, which can improve overall cluster performance.
By following these best practices, you can optimize your Kubernetes data plane configuration for maximum efficiency and reliability, ensuring that your cluster can handle the demands of your applications while maintaining high levels of performance and availability.
About StackState
Designed to help engineers of all skill levels who build and support Kubernetes-based applications, StackState provides the most effective solution available for Kubernetes troubleshooting. Our unique approach to SaaS observability helps teams quickly detect and remediate issues so they can ensure optimal system performance and reliability for their customers. With StackState’s comprehensive observability data, the most complete dependency map available, out-of-the-box applied knowledge and step-by-step troubleshooting guidance, any engineer can remediate issues accurately and with less toil.
As a company dedicated to helping teams succeed with Kubernetes, we want to provide useful information in as many related areas as we can. We hope this tutorial proves to be helpful for your team.
If you want to play around with StackState yourself, our playground is just a click away.
And when it’s time to set your focus on Kubernetes troubleshooting, sign up for a free trial to see how simple it can be.