
For many developers and engineers, Kubernetes is the de facto choice for container orchestration. That’s primarily because of its efficiency in handling and scaling container workloads. However, the complexity of managing nodes in a Kubernetes cluster can cause recurring headaches for even the most experienced and skilled IT teams.
This is where kubectl cordon comes into play. This command allows you to mark a node as “unschedulable,” which means that — until told otherwise — the existing pods will continue to run, but no new ones will be created on that node.
Keep reading to explore the kubectl cordon command for Kubernetes node management. Plus, find out how Cordon and Drain actions differ when it comes to pod scheduling in your cluster.
Key Takeaways:
The
kubectl cordoncommand marks a node as “unschedulable” so that new pods can not be scheduled onto that node.For effective node management in a Kubernetes cluster, it’s important to understand the difference between Cordon and Drain commands.
Using the
kubectl uncordoncommand reverses the effects of cordon and makes a node available for pod scheduling again.
Using kubectl cordon to effectively manage nodes
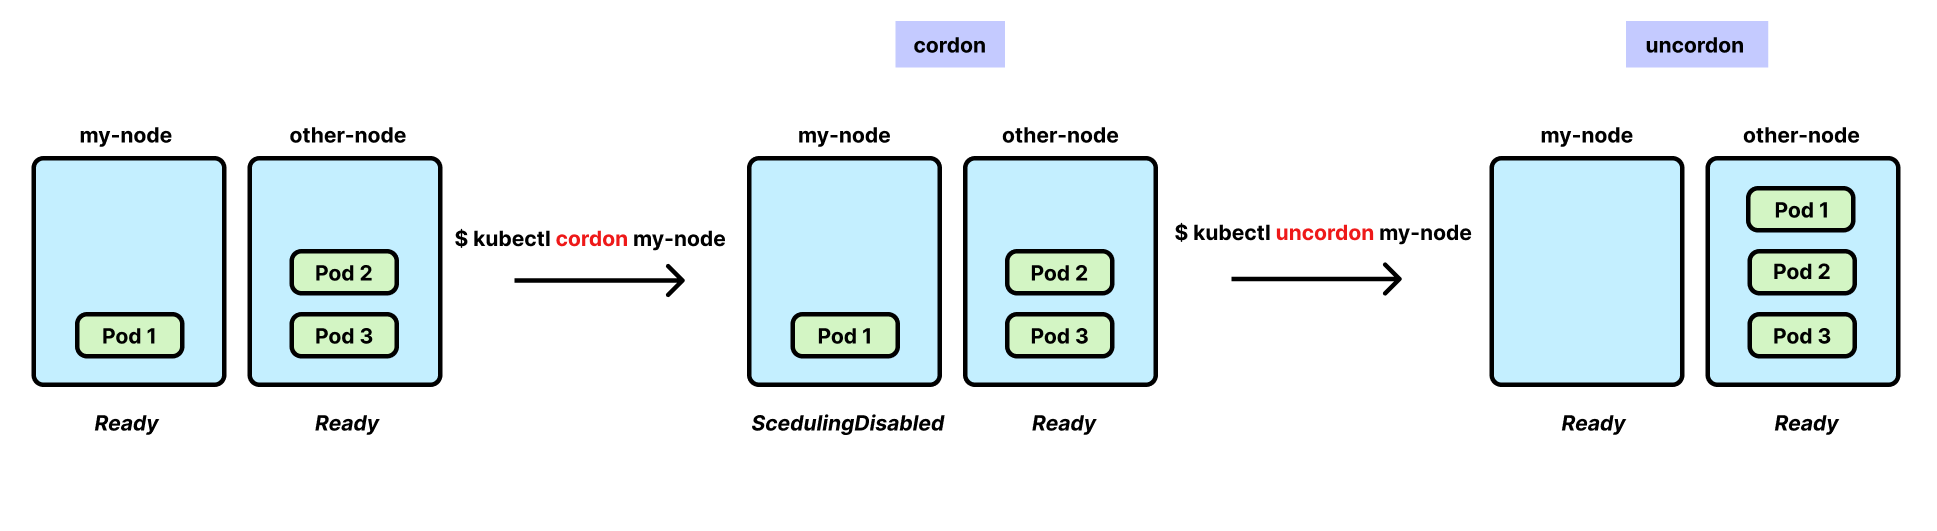
To allow for cluster maintenance, resource adjustments or targeted workload distribution, you may need to temporarily prevent new pods from running on a node. Luckily, there’s a simple command for that: kubectl cordon will create a node barricade, basically cordoning off your node. This ensures that while existing pods will remain running on the node, no new pods can be scheduled.
Resource contention — when multiple processes or components compete for the same computing resources, such as CPU, memory or disk I/O — can lead to potential conflicts, cause bottlenecks and slow down overall system performance. Cordoning a node helps avoid resource contention to provide a more evenly distributed workload.
To cordon a node in Kubernetes, use the following command:
kubectl cordon <node-name>All you have to do is replace <node-name> with the name of the node you want to cordon off. Once the command is executed, Kubernetes sets the unschedulable flag for the node, indicating that it’s no longer available for new pod scheduling.
To check the status of a node, use the following command:
kubectl get nodes <node-name>This will display information about the node’s status, including whether it has been cordoned off. Affected nodes will have a “Cordoned” status.
To make a node available for pod scheduling again, use the following command:
kubectl uncordon <node-name>Just replace <node-name> with the name of the node you want a cordon removed from. Once the command is executed, Kubernetes reverses the effects of the cordon and will no longer prevent pods from running on the node.
Optimizing resource allocation with kubectl uncordon
Removing a cordon from a node allows you to optimize resource allocation in your Kubernetes cluster by making the node schedulable again. This permits new pods to be distributed across all available nodes, ensuring efficient utilization of resources.
It's important to note that simply running kubectl uncordon will not automatically redistribute the pods across the nodes. Instead, Kubernetes will start allocating new pods to the newly uncordoned node by default.
Overall, kubectl cordon and kubectl uncordon are powerful commands that let us efficiently manage nodes in a Kubernetes cluster. With strategic use of both, we can fine-tune pod distribution across nodes, maximizing resource utilization and maintaining and ensuring high application availability during cluster maintenance.
What are some best practices for node cordon in Kubernetes?
When cordoning a node in Kubernetes, consider the following best practices:
Confirm that all critical pods on the node are appropriately moved or replicated before the cordon to avoid any disruption.
Monitor the resource usage and workload distribution of your cluster to make informed decisions on when to cordon or uncordon nodes.
Regularly review and adjust node cordoning based on your cluster's needs.
Understanding the difference between cordon and drain in Kubernetes.
Cordon and drain are two commands in Kubernetes that affect pod scheduling. As covered above, the cordon command involves marking a node as unschedulable, preventing the scheduling of new pods on a specific node.
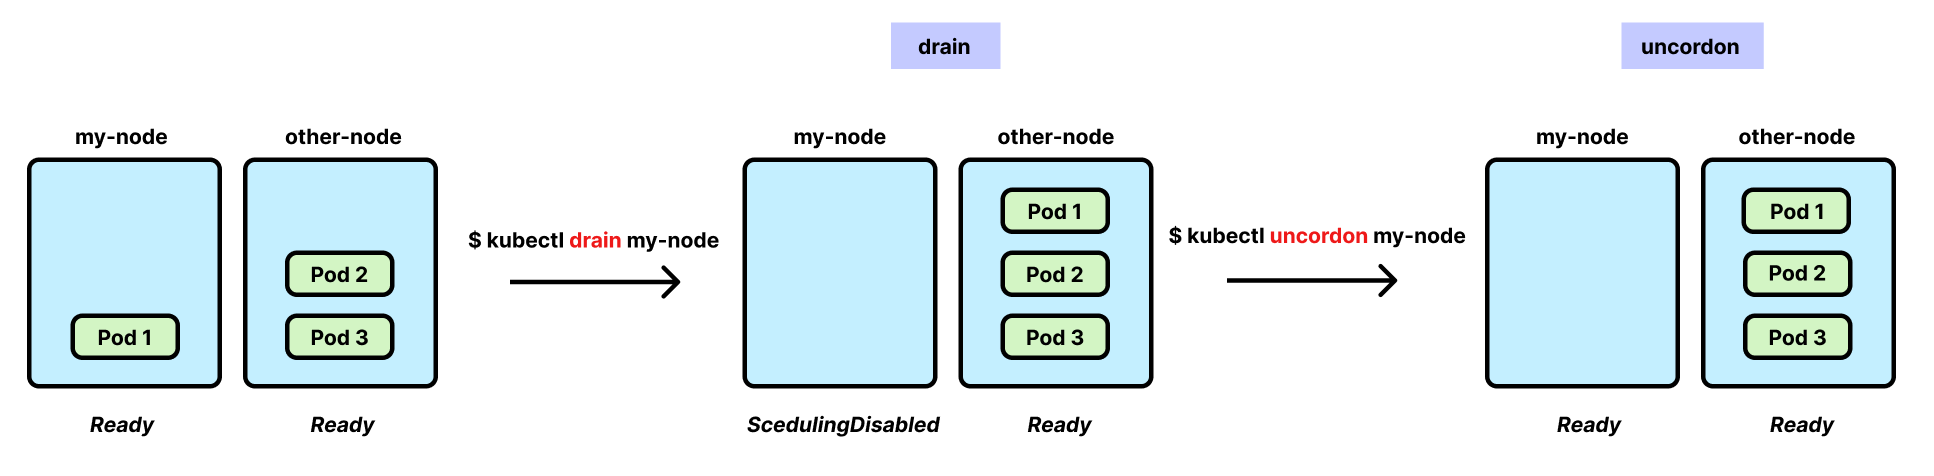
If you need to be stricter, there’s the drain command, which gracefully evicts all pods from a node before marking it as unschedulable.
Think of the node as a Kubernetes nightclub where pods come to party.
The Cordon command is like door security. When the club is at capacity, they won't allow anyone else in. But the pod patrons already inside can continue to dance and party.
The Drain command is more like the club’s fire marshal. When maintenance or upgrades are planned, the party is over, and the dancefloor is emptied. All pods are asked to leave the premises, and they can’t return until a new command is given.
When should you use the cordon and drain commands in your Kubernetes cluster?
Choosing between the cordon command and the drain command depends on the situation.
CORDON FOR A QUICK FIX:
If you need to perform a quick maintenance task, such as a software update, the cordon command may be sufficient.
The cordon command is commonly used when a node needs to be taken offline for light maintenance or upgrading. Marking the node as unschedulable ensures no new pods are scheduled and allows administrators to perform maintenance without disrupting currently running pods.
DRAIN FOR SUBSTANTIAL MAINTENANCE
If a more prolonged shutdown is needed, use the drain command to be confident of high application availability.
The drain command, on the other hand, takes all pods from a particular node and relocates them to others in the cluster before shutting the original pod down for maintenance or upgrades. By evicting and rescheduling the pods — and not allowing new ones to be scheduled — it safeguards data and maintains application availability throughout the entire process.
Take control of your Kubernetes environment.
Mastering the kubectl cordon and kubectl drain commands is a crucial skill for Kubernetes developers. Whether you're ensuring uninterrupted service during maintenance or troubleshooting node issues, the ability to cordon and/or drain nodes effectively contributes to a resilient and well-managed Kubernetes infrastructure.
Understanding the nuanced differences between kubectl cordon and kubectl drain provides you with greater control over your Kubernetes cluster dynamics and helps optimize it for both stability and performance.
About StackState
StackState is designed to help engineers and developers quickly identify and resolve issues in their Kubernetes-based applications. With features like real-time visualization, integrated monitors, guided remediation and time travel capabilities, StackState provides a comprehensive solution to streamline Kubernetes troubleshooting and improve system reliability. See for yourself in our live playground environment.